Red Velvet & Strawberry Chocolate Madeleine Tree: Festive Flavors Tower
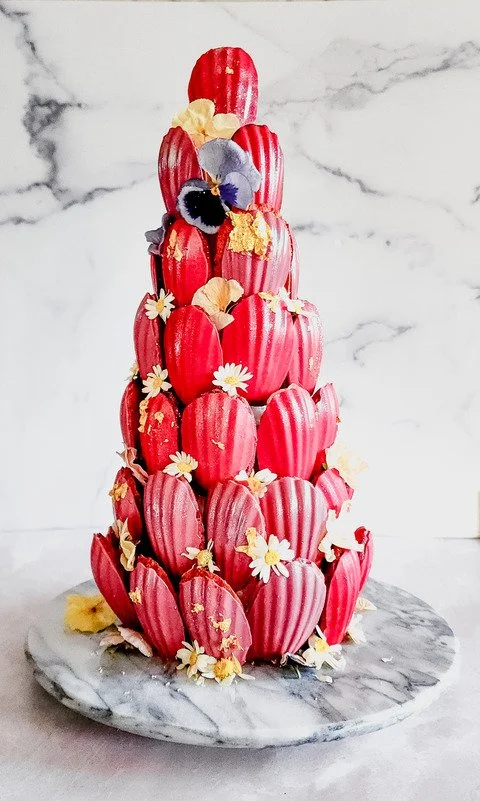
Get ready to deck the dessert table with the cutest holiday treat yet—my Red Velvet and Strawberry Chocolate-Coated Madeleines Tree! These little beauties are like mini cakes dressed to impress: think fluffy red velvet madeleines with a dreamy strawberry-chocolate coating, all stacked in a charming tree formation.
Imagine: soft, cocoa-flavored red velvet sponges dipped in creamy strawberry chocolate, topped with a sprinkle of festive sparkle! And let’s be honest, they’re as fun to bake as they are to eat (and they go just as fast). This Red Velvet Madeleine Tree is the centerpiece that brings cheer and an irresistible sugar rush, perfect for gifting or wowing at parties. So, let’s dive in and make some edible holiday magic!
Difficulty Level:
Perfect for All Skill Levels!
What You'll Learn in Class:
In this fun, detailed class, we'll be baking Red Velvet Madeleines with a smooth chocolate shell and Strawberry Madeleines filled with a delicious strawberry coulis. You’ll also master the art of building a beautiful and sturdy Madeleine Tree that’s ready to impress!
Yields:
48 gorgeous Madeleines
Equipment and Supplies needed:
Digital Kitchen Scale
Stand or Hand Mixer
Stand Mixer’s Bowl and Whisk Attachment
Small and Medium Bowls
Food Processor or Blender
4 of Madeleine Baking Pans
Silicone Spatulas
Measuring Spoons
Mesh Sifter
Hand Whisk
3 Piping Bags
Small Round Piping Tip ( for example, piping tip #10 or #11 by Wilton (or any other brand)
Small and Medium Sauce Pans/Pots
Kitchen Plastic/ Glade/Cling Film
Styrofoam Cone
Toothpicks
Pastry Brush
Ingredients needed:
Eggs
Granulated (White) Sugar
Salt
Vanilla Extract
All-Purpose Flour
Baking Powder
Unsweetened Cocoa Powder
Red and Pink (or Burgundy) Oil-Based Food Coloring Gels
Vegetable Oil
Unsalted Butter
Freeze-dried or Fresh Edible Flowers (optional)
Edible gold leaf (optional)
Powdered Sugar
Frozen Strawberries
Freeze Dried Strawberries
White Chocolate
Recipes
Prep Ahead of Class: Strawberry Coulis
To be done the night before or at least an hour before class
Ingredients:
100 g frozen strawberries, defrosted
50 g powdered sugar
Instructions:
Step 1: In a food processor or blender, puree the defrosted strawberries with the powdered sugar until silky smooth.
Step 2: Transfer the coulis to a piping bag fitted with a small round piping tip and refrigerate overnight (or at least 1 hour before class). This keeps it nice and chilled, ready to fill your madeleines!
In-Class Recipe, Step 1: Red Velvet Chocolate-Coated Madeleines
Yields:
Makes 24
Ingredients:
170 g unsalted butter, melted and cooled
2 large eggs
2 large egg yolks
205 g granulated sugar
1/8 tsp salt
2 tsp vanilla extract
178 g all-purpose flour
1/4 tsp baking powder
2 tbsp unsweetened cocoa powder
1 tbsp red oil-based food coloring gel
2 tbsp melted butter + 2 tbsp all-purpose flour (for greasing pans)
Chocolate Coating:
200 g white chocolate, melted
10 g vegetable oil
Red oil-based food coloring gel
Instructions:
Step 1 Prep the Pans: Preheat oven to 375°F (190°C). Brush each cavity of two madeleine pans with melted butter, then lightly dust with flour. Pop the pans in the freezer to set while you prep.
Step 2 Melt the Butter: Melt the butter in a small saucepan or microwave and let it cool.
Step 3 Mix the Wet Ingredients: In a stand mixer with a whisk attachment, whip the eggs, yolks, sugar, salt, and vanilla on high until light and fluffy (about 5-8 minutes).
Step 4 Mix the Dry Ingredients: In a separate bowl, sift together the flour, baking powder, and cocoa powder.
Step 5 Combine: Gently fold half the dry ingredients into the egg mixture with a spatula, then add the rest and fold until just combined.
Step 6 Add Color & Butter: Add the cooled melted butter and the red food coloring gel to the batter, folding in gently to avoid overmixing.
Step 7 Pipe & Bake: Transfer batter to a piping bag, take the pans out of the freezer, and fill each cavity 3/4 full. Bake on the middle rack for 10-12 minutes. Cool in the pan for 5 minutes, then transfer to a rack.
Step 8 Chocolate Coating: Wash and dry the pans. Mix the melted white chocolate, vegetable oil, and red food coloring gel. Pour 1 tsp of chocolate into each cavity, then press the madeleines into the chocolate. Freeze for 5-10 minutes to set, then pop them out!
In-Class Recipe, Step 2: Strawberry Madeleines
Yields:
Makes 24
Ingredients:
113 g unsalted butter, melted and cooled
2 large eggs, room temperature
100 g granulated sugar
1/4 tsp salt
1 tsp vanilla extract
110 g all-purpose flour
1/2 tsp baking powder
2 tbsp powdered freeze-dried strawberries
Chocolate Coating:
200 g white chocolate, melted
10 g vegetable oil
Pink or burgundy oil-based food coloring gel
Instructions:
Step 1 Prep the Pans: Preheat oven to 375°F (190°C). Grease and flour the madeleine pans as before, then place in the freezer.
Step 2 Melt the Butter: Melt butter and let it cool.
Step 3 Mix the Wet Ingredients: In a stand mixer with the whisk attachment, whip eggs, sugar, salt, and vanilla until fluffy, about 5-8 minutes.
Step 4 Combine Dry Ingredients: In a separate bowl, sift together flour, baking powder, and powdered strawberries.
Step 5 Combine Wet and Dry: Fold half the dry ingredients into the egg mixture, then fold in the rest. Stir in the cooled melted butter, careful not to overmix.
Step 6 Pipe & Bake: Fill the pans as before, then bake for 10-12 minutes. Cool in the pan for 5 minutes, then transfer to a cooling rack.
Step 7 Coat in Chocolate: Mix the white chocolate, oil, and pink/burgundy food coloring. Fill each cavity with 1 tsp of pink chocolate, then press the madeleines into the chocolate. Freeze for 5-10 minutes.
Step 8 Add Strawberry Coulis: Use a straw, chopstick, or piping tip to make a small hole in each madeleine, then fill with the strawberry coulis.
In-Class Assembly, Step 3: Building the Madeleine Tree
Supplies:
13.5-14” Styrofoam cone
48 toothpicks
Kitchen plastic wrap
Cake board or serving platter (optional)
Edible flowers and gold leaf (optional, for decoration)
Instructions:
Step 1 Wrap the Cone: Cover the cone with plastic wrap, tucking in the ends on the bottom. Attach to a cake board or platter with melted chocolate if needed for stability.
Step 2 Assemble the Tree: Starting from the bottom, insert toothpicks into the cone and attach chocolate-coated madeleines, working your way up.
Step 3 Decorate: Fill any open spots with edible flowers or gold leaf for a festive touch!
Enjoy your stunning Madeleine Tree masterpiece! 🎄

Red Velvet & Strawberry Chocolate Madeleine Tree: Festive Flavors Tower
Ingredients
- Eggs
- Granulated (White) Sugar
- Salt
- Vanilla Extract
- All-Purpose Flour
- Baking Powder
- Unsweetened Cocoa Powder
- Red and Pink (or Burgundy) Oil-Based Food Coloring Gels
- Vegetable Oil
- Unsalted Butter
- Freeze-dried or Fresh Edible Flowers (optional)
- Edible gold leaf (optional)
- Powdered Sugar
- Frozen Strawberries
- Freeze Dried Strawberries
- White Chocolate
- 100 g frozen strawberries, defrosted
- 50 g powdered sugar
- 170 g unsalted butter, melted and cooled
- 2 large eggs
- 2 large egg yolks
- 205 g granulated sugar
- 1/8 tsp salt
- 2 tsp vanilla extract
- 178 g all-purpose flour
- 1/4 tsp baking powder
- 2 tbsp unsweetened cocoa powder
- 1 tbsp red oil-based food coloring gel
- 2 tbsp ' data-amount-secondary='28 g'>2 tbsp melted butter + 2 tbsp all-purpose flour (for greasing pans)
- 200 g white chocolate, melted
- 10 g vegetable oil
- Red oil-based food coloring gel
- 113 g unsalted butter, melted and cooled
- 2 large eggs, room temperature
- 100 g granulated sugar
- 1/4 tsp salt
- 1 tsp vanilla extract
- 110 g all-purpose flour
- 1/2 tsp baking powder
- 2 tbsp powdered freeze-dried strawberries
- 200 g white chocolate, melted
- 10 g vegetable oil
- Pink or burgundy oil-based food coloring gel
Instructions
- Step 1 Prep the Pans: Preheat oven to 375°F (190°C). Brush each cavity of two madeleine pans with melted butter, then lightly dust with flour. Pop the pans in the freezer to set while you prep.
- Step 2 Melt the Butter: Melt the butter in a small saucepan or microwave and let it cool.
- Step 3 Mix the Wet Ingredients: In a stand mixer with a whisk attachment, whip the eggs, yolks, sugar, salt, and vanilla on high until light and fluffy (about 5-8 minutes).
- Step 4 Mix the Dry Ingredients: In a separate bowl, sift together the flour, baking powder, and cocoa powder.
- Step 5 Combine: Gently fold half the dry ingredients into the egg mixture with a spatula, then add the rest and fold until just combined.
- Step 6 Add Color & Butter: Add the cooled melted butter and the red food coloring gel to the batter, folding in gently to avoid overmixing.
- Step 7 Pipe & Bake: Transfer batter to a piping bag, take the pans out of the freezer, and fill each cavity 3/4 full. Bake on the middle rack for 10-12 minutes. Cool in the pan for 5 minutes, then transfer to a rack.
- Step 8 Chocolate Coating: Wash and dry the pans. Mix the melted white chocolate, vegetable oil, and red food coloring gel. Pour 1 tsp of chocolate into each cavity, then press the madeleines into the chocolate. Freeze for 5-10 minutes to set, then pop them out!
- Step 1 Prep the Pans: Preheat oven to 375°F (190°C). Grease and flour the madeleine pans as before, then place in the freezer.
- Step 2 Melt the Butter: Melt butter and let it cool.
- Step 3 Mix the Wet Ingredients: In a stand mixer with the whisk attachment, whip eggs, sugar, salt, and vanilla until fluffy, about 5-8 minutes.
- Step 4 Combine Dry Ingredients: In a separate bowl, sift together flour, baking powder, and powdered strawberries.
- Step 5 Combine Wet and Dry: Fold half the dry ingredients into the egg mixture, then fold in the rest. Stir in the cooled melted butter, careful not to overmix.
- Step 6 Pipe & Bake: Fill the pans as before, then bake for 10-12 minutes. Cool in the pan for 5 minutes, then transfer to a cooling rack.
- Step 7 Coat in Chocolate: Mix the white chocolate, oil, and pink/burgundy food coloring. Fill each cavity with 1 tsp of pink chocolate, then press the madeleines into the chocolate. Freeze for 5-10 minutes.
- Step 8 Add Strawberry Coulis: Use a straw, chopstick, or piping tip to make a small hole in each madeleine, then fill with the strawberry coulis.
- Step 1 Wrap the Cone: Cover the cone with plastic wrap, tucking in the ends on the bottom. Attach to a cake board or platter with melted chocolate if needed for stability.
- Step 2 Assemble the Tree: Starting from the bottom, insert toothpicks into the cone and attach chocolate-coated madeleines, working your way up.
- Step 3 Decorate: Fill any open spots with edible flowers or gold leaf for a festive touch!


