
Fall Brownies: A Cozy Pumpkin Twist on Classic Chocolate

I’m so excited to share this recipe with you because it was an absolute blast to develop and film for Twisted! These Fall Brownies are a delicious twist on classic chocolate brownies, and they’re perfect for the cozy season. Imagine gooey, decadent chocolate with a hint of pumpkin, topped with adorable fall-themed decorations—what’s not to love? I hope you enjoy making them as much as I did! 🥰
Reasons to Love These Fall Brownies
Decadent Flavor: The combination of dark chocolate and pumpkin puree creates a rich, moist brownie with a touch of seasonal spice.
Fun to Make: With the easy-to-follow steps and festive decorations, these brownies are as much fun to make as they are to eat.
Perfect for Any Occasion: Whether it’s Thanksgiving, Halloween, or just a fall-themed gathering, these brownies are sure to impress.
Customizable Decorations: The fun chocolate decorations let you get creative and make each batch uniquely yours.
Tools and Equipment
To make your baking process smooth and enjoyable, here’s what you’ll need:
Stand Mixer: For creaming the sugar and eggs and mixing the brownie batter.
Microwave-Safe Bowl: For melting the butter and chocolate.
Silicone Mold or Brownie Pan: To bake the brownies. If using a silicone mold, ensure it's well greased.
Piping Bags: For adding chocolate decorations.
Spatula: For folding in the chocolate chips and spreading the batter.
Cooling Rack: To cool the brownies before decorating.
Let’s Talk Ingredients
Before we dive into the recipe, let’s go over the ingredients. You’ll need a mix of pantry staples and a few seasonal goodies:
For the Brownies:
1 1/3 cups (265 g) brown sugar: Adds a deep, molasses flavor and keeps the brownies moist.
2 eggs, room temperature: Helps bind everything together and gives the brownies structure.
1/4 cup (55 g) pumpkin puree: The secret ingredient that makes these brownies extra moist and gives them a fall twist!
1/2 cup (113 g) unsalted butter: Richness and flavor, melted to combine with the chocolate.
1 cup (100 g) dark chocolate chips or chunks: For that gooey, chocolatey goodness.
1/4 cup (54 g) vegetable oil: Adds moisture and keeps the brownies soft.
2 tsp vanilla extract: A must for flavor!
1/2 cup (75 g) all-purpose flour: Just enough to give structure without making them cakey.
1/2 cup (50 g) unsweetened cocoa powder: Intensifies the chocolate flavor.
1 tbsp cornstarch: Helps create that perfect crinkly top.
1/4 tsp salt: Enhances all the flavors.
1/2 cup (50 g) dark chocolate chips: Folded in at the end for extra chocolatey bits.
For the Chocolate Coating:
Dark chocolate, melted: The base for the decoration.
White chocolate, melted: For contrasting details.
Brown, green, red, and orange oil-based food coloring gels: To give your decorations those perfect fall colors.
Alternative: You can also use candy melts in coordinating colors if you prefer.


Let’s Get Baking!
Ready to make some magic in the kitchen? Here’s how to create these delightful Fall Brownies:
1. Preheat and Prepare
Start by preheating your oven to 325°F (165°C). This lower temperature helps the brownies bake evenly, giving you that perfect gooey center and crinkly top. Grease your silicone mold cavities (or a regular brownie pan if you’re not using a mold) so the brownies release easily later on.
2. Cream the Sugar, Eggs, and Pumpkin
In the bowl of a stand mixer fitted with the paddle attachment, add the brown sugar, eggs, and pumpkin puree. Cream these together on high speed until the mixture is light and fluffy. This step adds air to the batter, helping the brownies achieve that perfect texture.
3. Melt the Chocolate and Butter
In a microwave-safe bowl, melt the butter in 30-second increments, stirring between each until fully melted. Once the butter is melted, add the dark chocolate chips or chunks and stir until the chocolate is completely melted and combined with the butter. This chocolate mixture is going to make your brownies ultra-rich and decadent.
4. Combine the Wet Ingredients
Turn down the speed of your mixer to low, and slowly add the melted butter and chocolate mixture to the creamed sugar, eggs, and pumpkin. Next, add the vegetable oil and vanilla extract. Mix until everything is just combined—don’t overmix!
5. Add the Dry Ingredients
In a separate bowl, sift together the flour, cocoa powder, cornstarch, and salt. This ensures there are no lumps in your dry ingredients, which can create an uneven texture in your brownies. With the mixer on low speed, gradually add the dry ingredients to the wet mixture. Mix just until combined, being careful not to overmix—this keeps the brownies tender and fudgy.
6. Fold in the Chocolate Chips
Using a silicone spatula, gently fold in the additional 1/2 cup of dark chocolate chips. This step ensures you get little pockets of melty chocolate throughout each brownie bite.
7. Fill and Bake
If you’re using a silicone mold, fill each cavity with the brownie batter about 2/3 of the way full. If you’re using a regular brownie pan, pour the batter into the pan and smooth it out. Place the mold or pan on the middle rack of your preheated oven and bake for 30-35 minutes. You’ll know they’re ready when the tops are crinkly, and a toothpick inserted in the center comes out mostly clean but still a little moist—this means they’ll be nice and fudgy!
8. Cool and Freeze
Once the brownies are baked, allow them to cool to room temperature. Then, pop them into the freezer for 10-15 minutes. This makes it easier to remove the brownies from the silicone mold without breaking them.
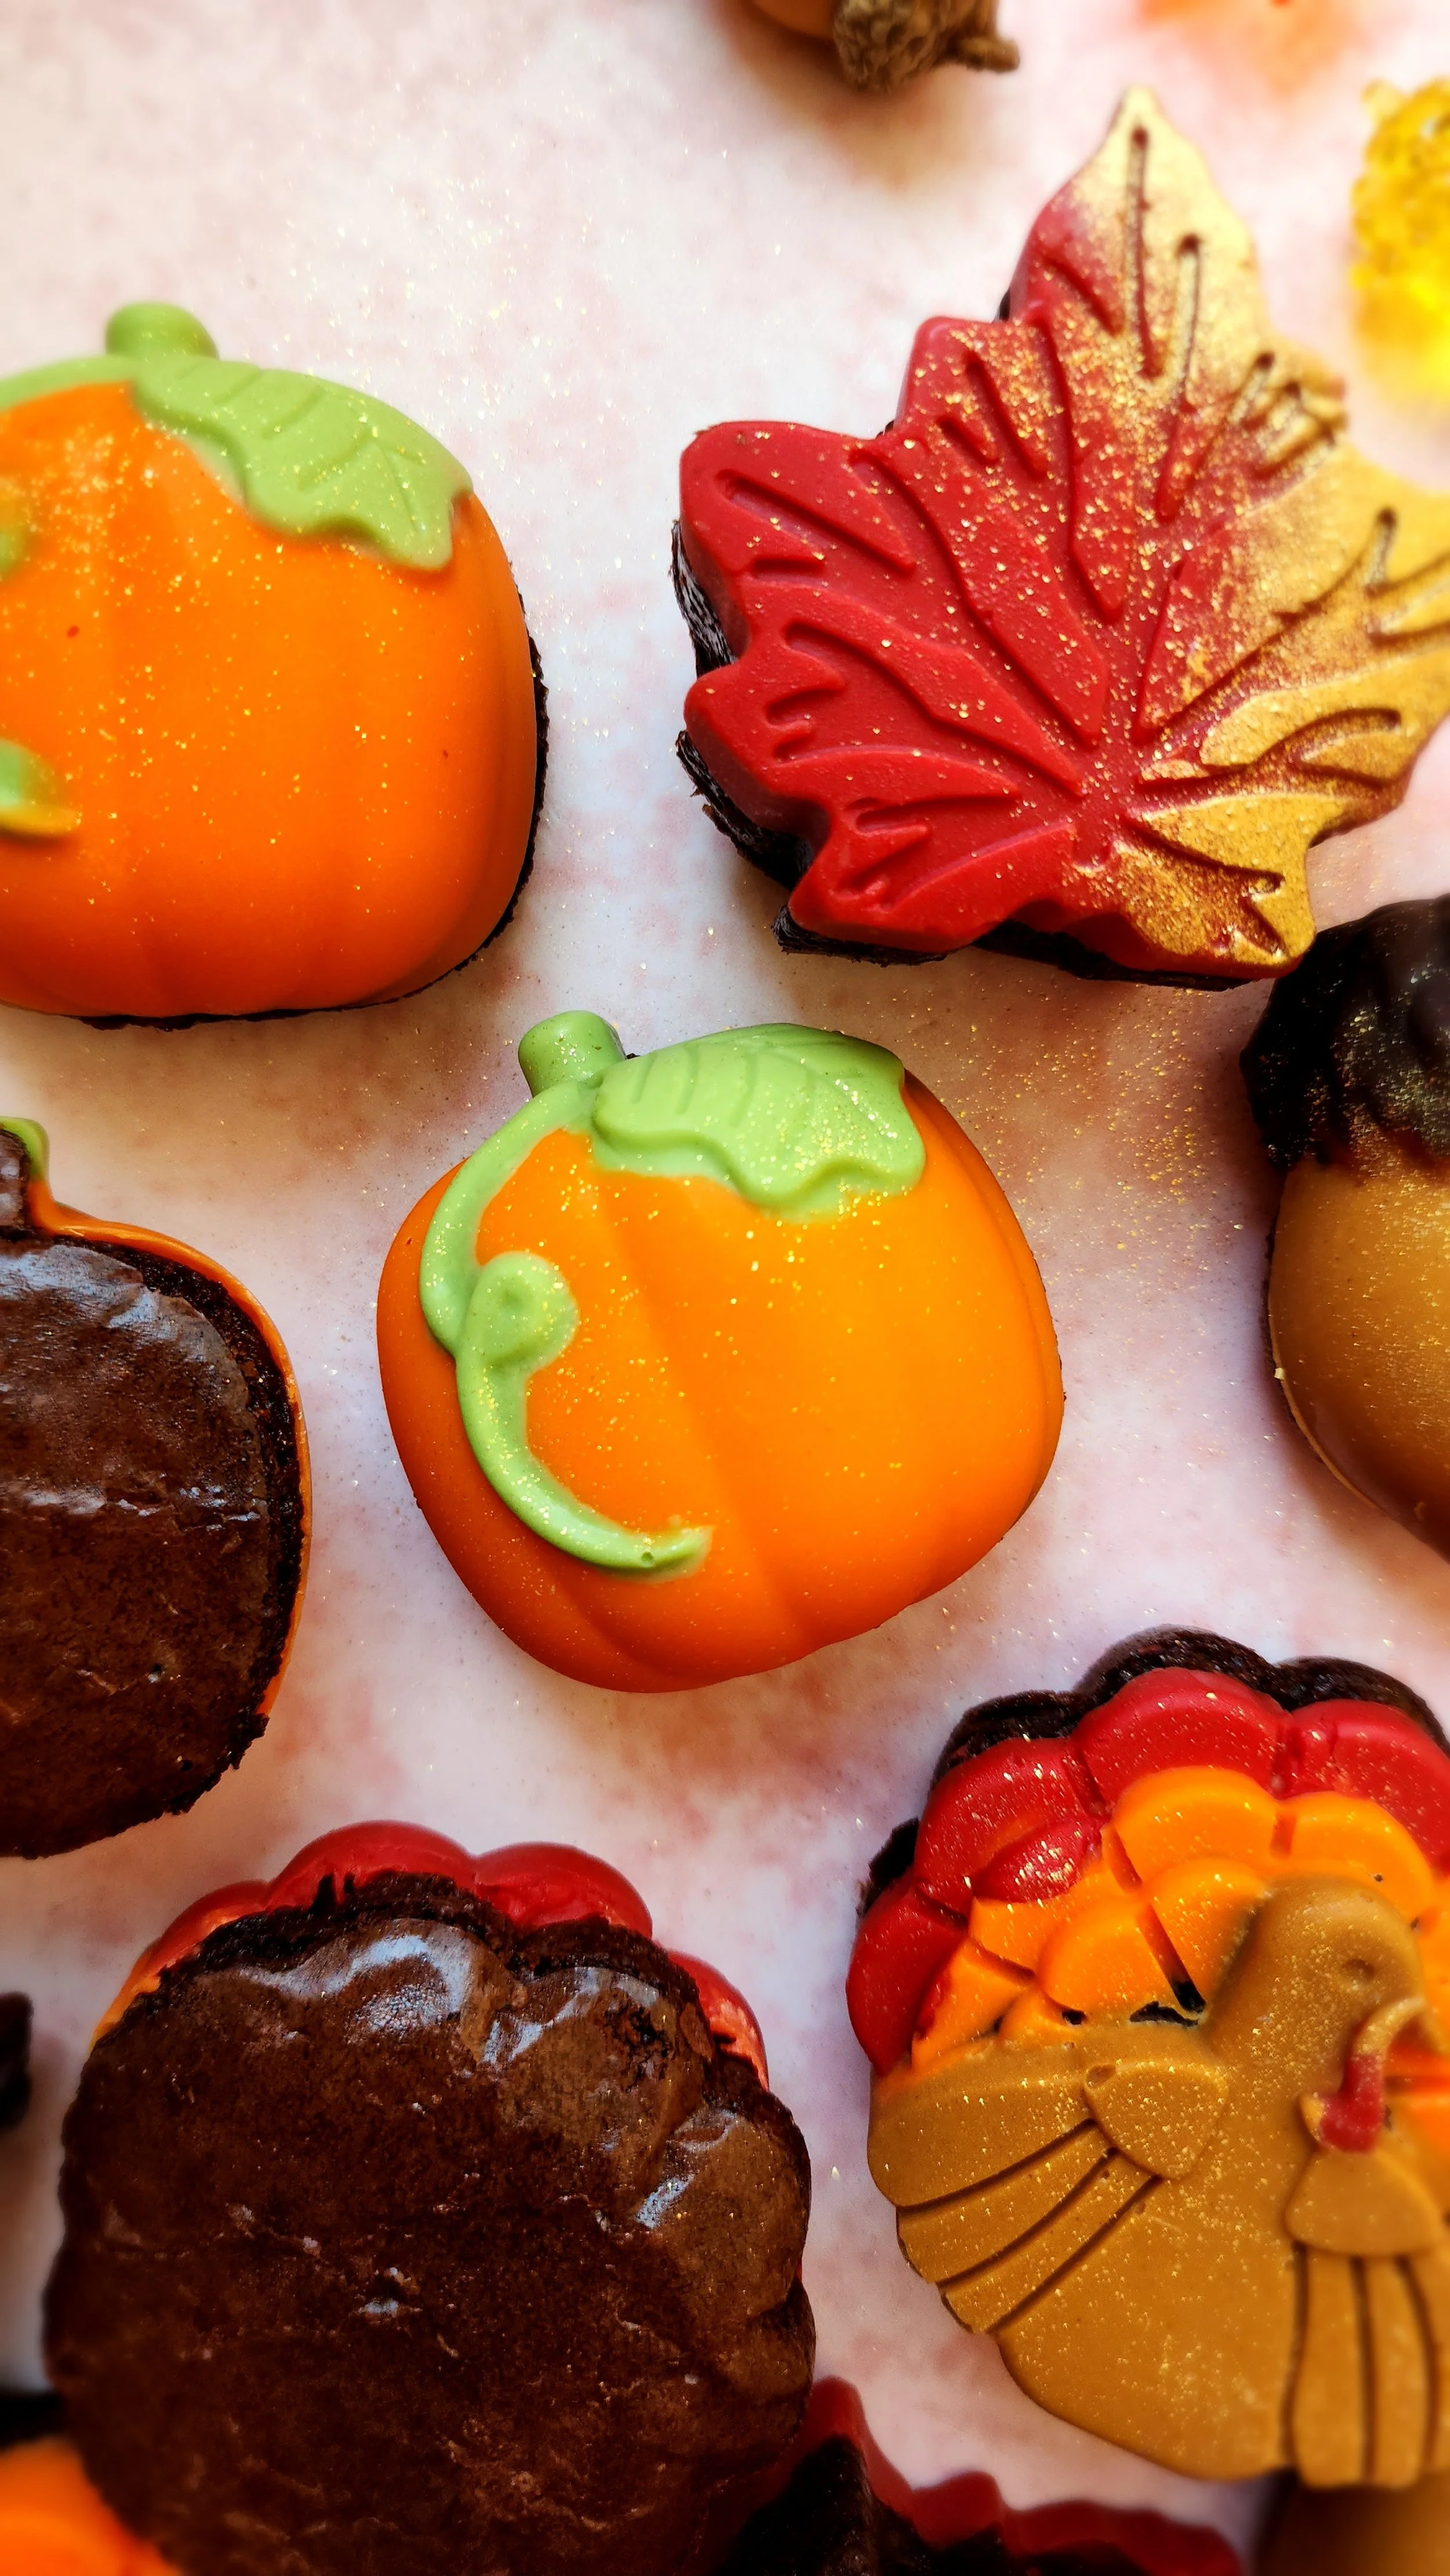
9. Decorate the Brownies
While your brownies are chilling, wash and dry the mold. Melt your dark and white chocolate, and color the white chocolate with the oil-based food coloring gels in fall shades—think warm browns, oranges, reds, and greens. Pipe or spoon the melted chocolate into the details of the mold cavities, creating beautiful fall-themed designs. Lightly press the chilled brownie shapes back into the mold, over the chocolate, and return to the freezer for another 15-20 minutes.
10. Unmold and Enjoy!
After the chocolate has set, remove the mold from the freezer and let it stand at room temperature for about 5 minutes. Carefully unmold your decorated brownies and admire your work! They’re ready to package as gifts, serve at a party, or simply enjoy with a hot cup of cocoa. 🍫🍂
Tips for Success
Room Temperature Ingredients: Make sure your eggs are at room temperature before mixing. This helps them blend smoothly with the other ingredients.
Proper Mixing: Don’t overmix the batter once you add the dry ingredients—just mix until combined to keep the brownies tender and fudgy.
Chill for Easy Removal: Chill the brownies before removing them from the mold to avoid breakage and make the process easier.
Use Fresh Ingredients: Ensure your baking ingredients are fresh for the best flavor and texture.
Troubleshooting Tips
Brownies are Too Dry: If the brownies come out too dry, it could be due to overbaking. Make sure to check them a few minutes before the end of the baking time and remove them when the tops are crinkly and the toothpick comes out with a few moist crumbs.
Chocolate Decorations Are Smudged: If your chocolate decorations smudge, try chilling the decorated brownies again to set the chocolate fully before handling.
Variations
Add Nuts: Fold in chopped walnuts or pecans for extra crunch and flavor.
Swirl in Caramel: Add swirls of caramel sauce to the brownie batter before baking for a caramel-chocolate twist.
Use White Chocolate: Substitute some of the dark chocolate with white chocolate for a different flavor profile and a lighter color.
Storing and Serving
Storing: Keep your brownies in an airtight container at room temperature for up to 5 days. For longer storage, place them in the refrigerator for up to 1 week or freeze them for up to 3 months.
Serving: Serve the brownies at room temperature or slightly warmed. They’re great on their own or paired with a scoop of vanilla ice cream.
More Decorating Ideas
Fall Sprinkles: Add sprinkles in fall colors (orange, red, yellow) for extra flair.
Edible Gold Dust: Sprinkle a little edible gold dust on top for a touch of elegance.
Pumpkin Candy: Decorate with miniature candy pumpkins for a festive look.
Pairing Suggestions
Spiced Apple Cider: A warm mug of spiced apple cider pairs perfectly with the rich chocolate and pumpkin flavors.
Hot Chocolate: For a double dose of chocolate, enjoy these brownies with a creamy hot chocolate.
Coffee: A strong cup of coffee balances the sweetness and complements the rich flavors of the brownies.
Fun Trivia
Did you know that pumpkins were once used as an ingredient in pies in colonial America long before the first apple pie? They were a staple in fall harvests and made an excellent base for sweet treats. These Fall Brownies give a nod to that tradition, combining pumpkin with chocolate for a deliciously modern twist!

Fall Chocolate Pumpkin Brownie Recipe
Ingredients
- 1 1/3 cups (265 g) brown sugar: Adds a deep, molasses flavor and keeps the brownies moist.
- 2 eggs, room temperature: Helps bind everything together and gives the brownies structure.
- 1/4 cup (55 g) pumpkin puree: The secret ingredient that makes these brownies extra moist and gives them a fall twist!
- 1/2 cup (113 g) unsalted butter: Richness and flavor, melted to combine with the chocolate.
- 1 cup (100 g) dark chocolate chips or chunks: For that gooey, chocolatey goodness.
- 1/4 cup (54 g) vegetable oil: Adds moisture and keeps the brownies soft.
- 2 tsp vanilla extract: A must for flavor!
- 1/2 cup (75 g) all-purpose flour: Just enough to give structure without making them cakey.
- 1/2 cup (50 g) unsweetened cocoa powder: Intensifies the chocolate flavor.
- 1 tbsp cornstarch: Helps create that perfect crinkly top.
- 1/4 tsp salt: Enhances all the flavors.
- 1/2 cup (50 g) dark chocolate chips: Folded in at the end for extra chocolatey bits.
- Dark chocolate, melted: The base for the decoration.
- White chocolate, melted: For contrasting details.
- Brown, green, red, and orange oil-based food coloring gels: To give your decorations those perfect fall colors.
- Alternative: You can also use candy melts in coordinating colors if you prefer.
Instructions
- Preheat and Prepare: Start by preheating your oven to 325°F (165°C). This lower temperature helps the brownies bake evenly, giving you that perfect gooey center and crinkly top. Grease your silicone mold cavities (or a regular brownie pan if you’re not using a mold) so the brownies release easily later on.
- Cream the Sugar, Eggs, and Pumpkin: In the bowl of a stand mixer fitted with the paddle attachment, add the brown sugar, eggs, and pumpkin puree. Cream these together on high speed until the mixture is light and fluffy. This step adds air to the batter, helping the brownies achieve that perfect texture.
- Melt the Chocolate and Butter: In a microwave-safe bowl, melt the butter in 30-second increments, stirring between each until fully melted. Once the butter is melted, add the dark chocolate chips or chunks and stir until the chocolate is completely melted and combined with the butter. This chocolate mixture is going to make your brownies ultra-rich and decadent.
- Combine the Wet Ingredients: Turn down the speed of your mixer to low, and slowly add the melted butter and chocolate mixture to the creamed sugar, eggs, and pumpkin. Next, add the vegetable oil and vanilla extract. Mix until everything is just combined—don’t overmix!
- Add the Dry Ingredients: In a separate bowl, sift together the flour, cocoa powder, cornstarch, and salt. This ensures there are no lumps in your dry ingredients, which can create an uneven texture in your brownies. With the mixer on low speed, gradually add the dry ingredients to the wet mixture. Mix just until combined, being careful not to overmix—this keeps the brownies tender and fudgy.
- Fold in the Chocolate Chips: Using a silicone spatula, gently fold in the additional 1/2 cup of dark chocolate chips. This step ensures you get little pockets of melty chocolate throughout each brownie bite.
- Fill and Bake: If you’re using a silicone mold, fill each cavity with the brownie batter about 2/3 of the way full. If you’re using a regular brownie pan, pour the batter into the pan and smooth it out. Place the mold or pan on the middle rack of your preheated oven and bake for 30-35 minutes. You’ll know they’re ready when the tops are crinkly, and a toothpick inserted in the center comes out mostly clean but still a little moist—this means they’ll be nice and fudgy!
- Cool and Freeze: Once the brownies are baked, allow them to cool to room temperature. Then, pop them into the freezer for 10-15 minutes. This makes it easier to remove the brownies from the silicone mold without breaking them.
- Decorate the Brownies: While your brownies are chilling, wash and dry the mold. Melt your dark and white chocolate, and color the white chocolate with the oil-based food coloring gels in fall shades—think warm browns, oranges, reds, and greens. Pipe or spoon the melted chocolate into the details of the mold cavities, creating beautiful fall-themed designs. Lightly press the chilled brownie shapes back into the mold, over the chocolate, and return to the freezer for another 15-20 minutes.
- Unmold and Enjoy!: After the chocolate has set, remove the mold from the freezer and let it stand at room temperature for about 5 minutes. Carefully unmold your decorated brownies and admire your work! They’re ready to package as gifts, serve at a party, or simply enjoy with a hot cup of cocoa. 🍫🍂


